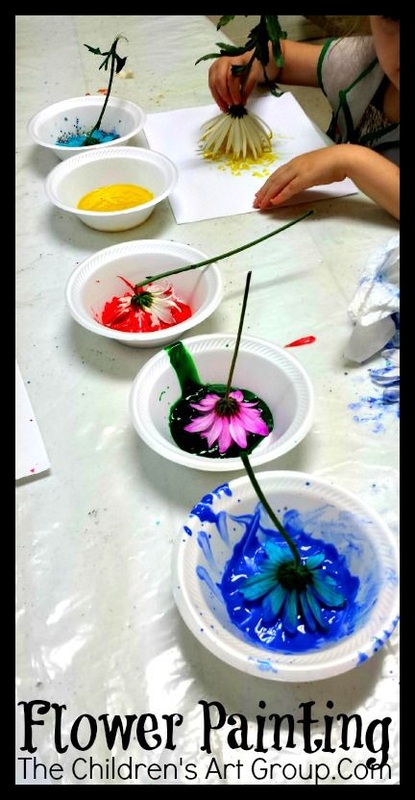
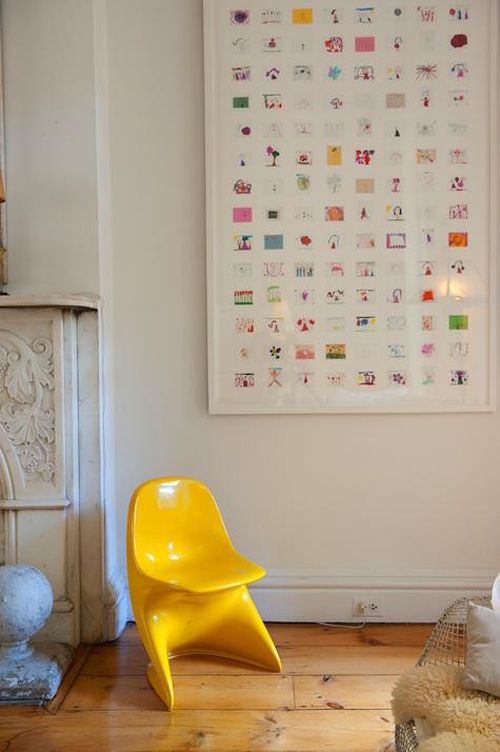
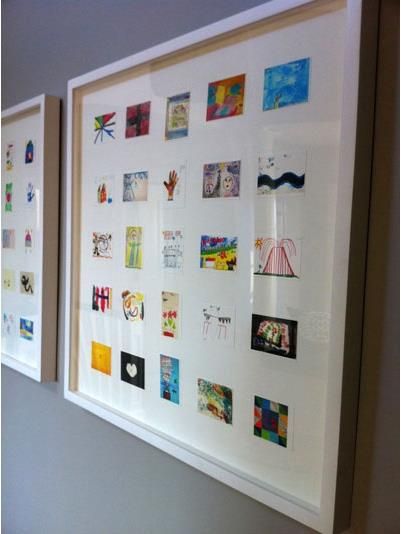
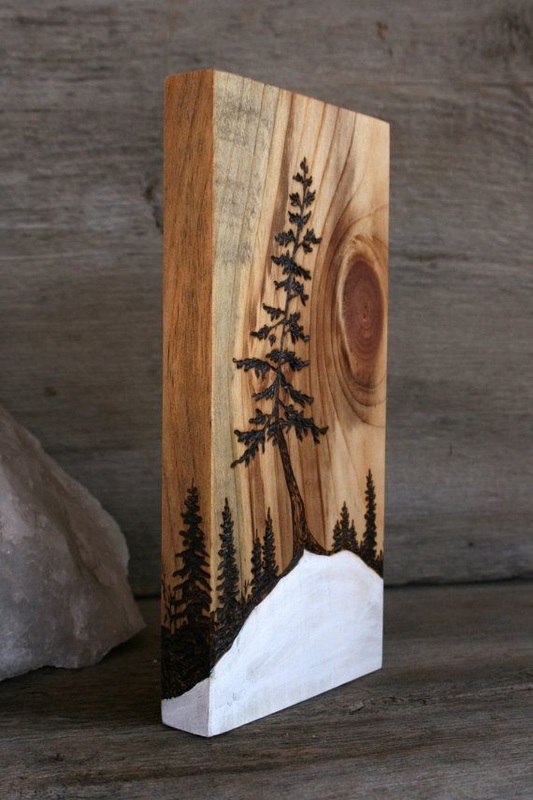
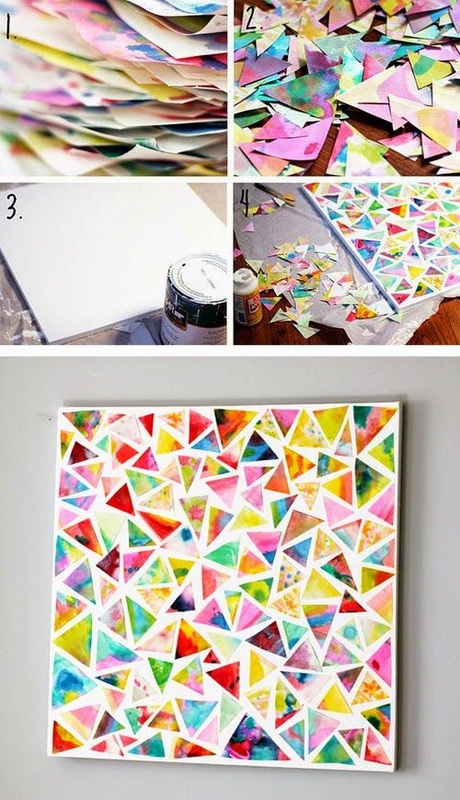
 So you want your kid to be an artist, or perhaps they were born with the creative gene. Whatever the situation may be, one thing is for certain, you are proud of what your little one has accomplished. But, now the task is hanging this unique piece of art in your home without your lovely home looking like kindergarten classroom walls. Here are some tips on what you can do to ensure your little ones art piece looks more stellar than usual. First of forget on giving your child computer paper to doodle on. If you think that your child produces good art then give them a different canvas. You could even ask, or take your kid with you to the store, to figure out what type of canvas to use. Most Importantly, the more you focus on your children's art the more special and unique they are bound to feel with your increased participation. 1. Linen paper is sturdier, creates a textured look (especially when they use crayons or water colors) and is easier to frame than computer paper. Also, Try using a different utensil to paint (in the example picture below a flower is used instead of a typical brush). 2. Scan. Use whatever doodles, paintings, watercolors or sketches your little one has created and scan them into a file. Then, create miniature images with those works of art. Finally with your miniature scans, find a large frame and matte those scans. 3. Chalkboards. Hang sets of Chalkboard on your walls about 2 to 3 inches apart. There is no need to use different paper here. The collection of their art will speak for itself. 4. Tile. Painting on tile was always one of my favorite childhood memories. You can by tile at any local home improvement store, and space out the days you paint or make a creative day out of it. Once you finish be sure to put a thin layer of clear paint (or clear nail polish works too) and use the tile in a frame, in freshly poured cement, as the bathroom backsplash or whatever your child thinks would be stellar. 5. Wood. Painting on a wood canvas is always interesting. Any size, shape, or type works. Make sure that before you hand over that piece of wood that it was sanded, washed and re-sanded. Splinters are no fun. 6. Water Colors and Scissors. If you are a creative parent, or even just a parent that understands symmetry this is a project that is fun for everyone Have your child or children use water colors to make a tie-dye sheet of paper. After they dry, cut the water colored paper into shapes and paste them on card stock. Frame the art modestly, and whah-la you made art as a family! Remember to have fun, and if you are the creative parent yourself - join in!
0 Comments
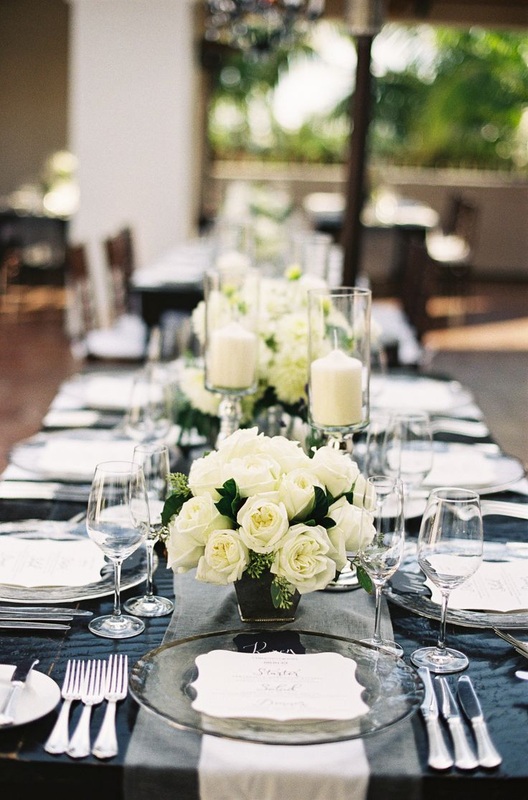
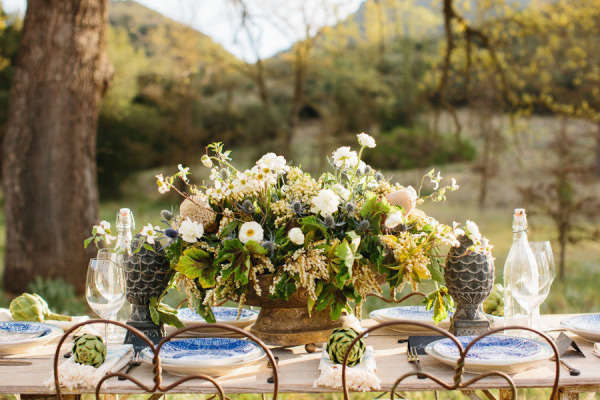
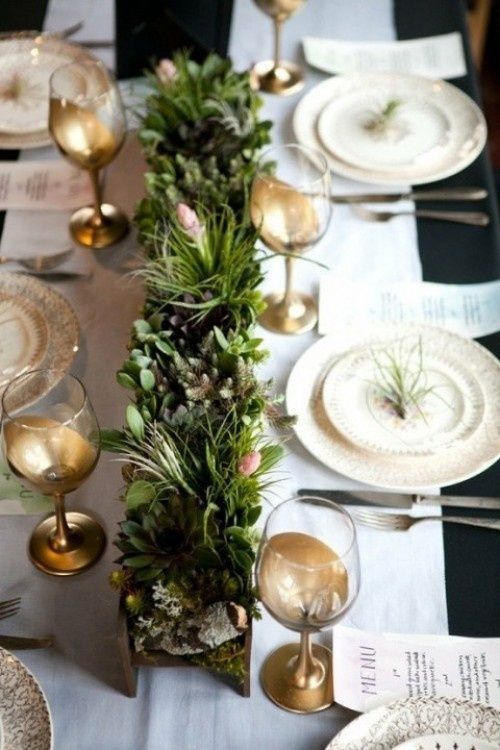
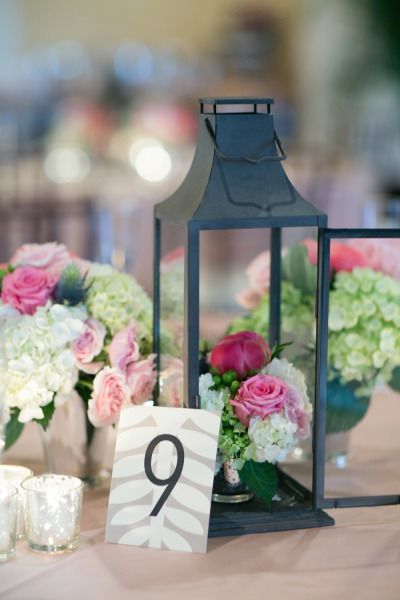
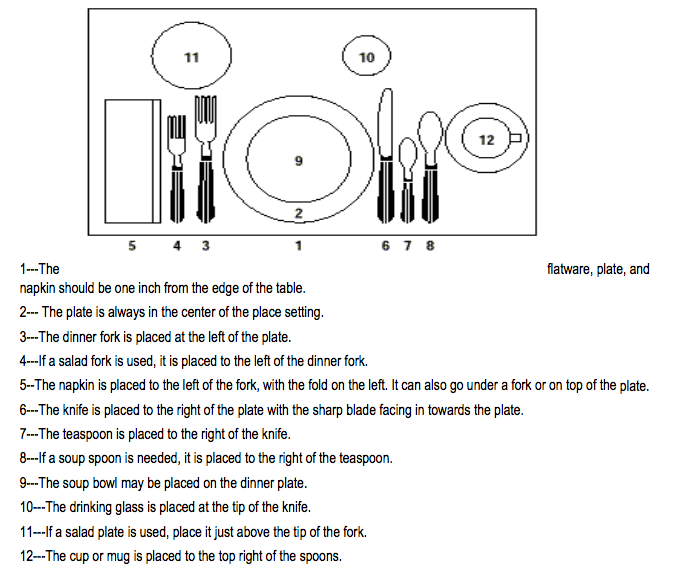
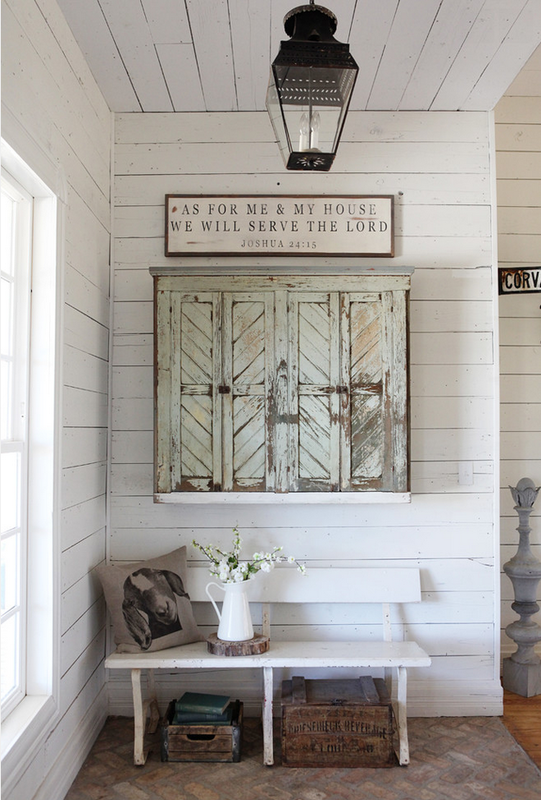
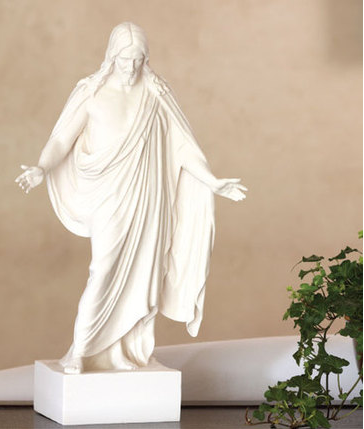
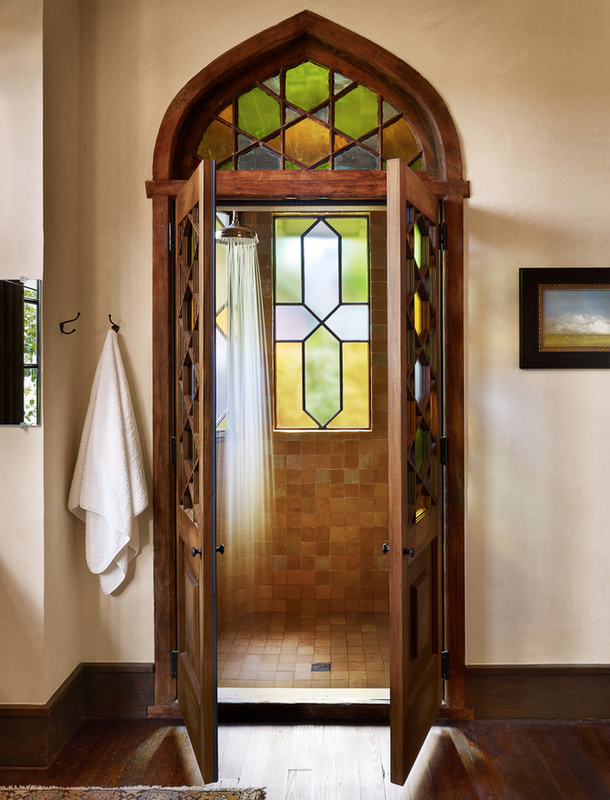
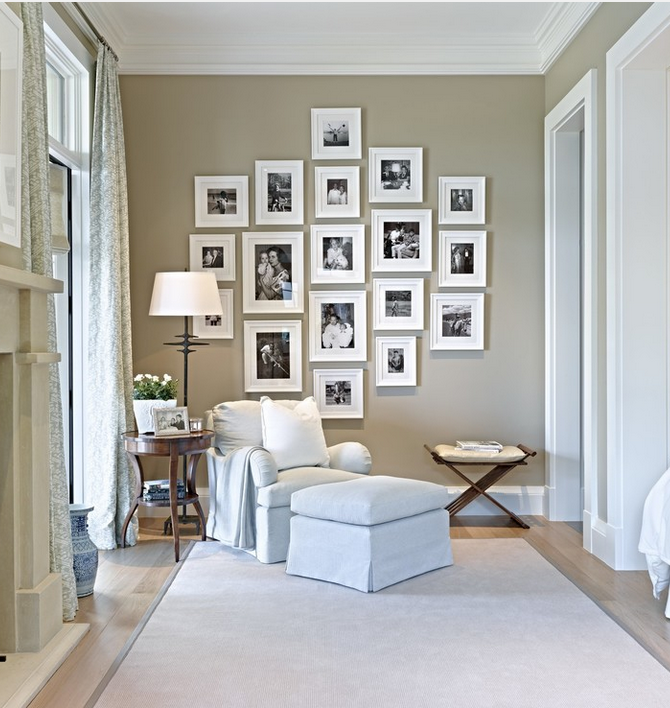
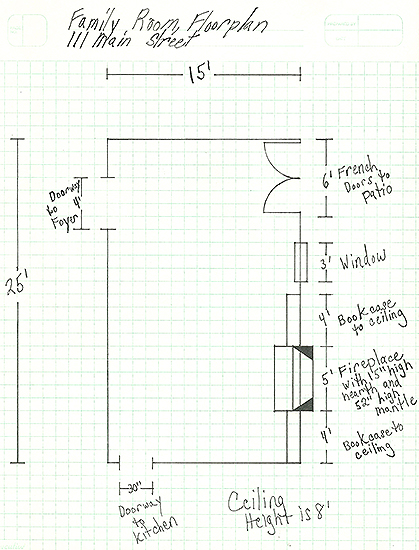
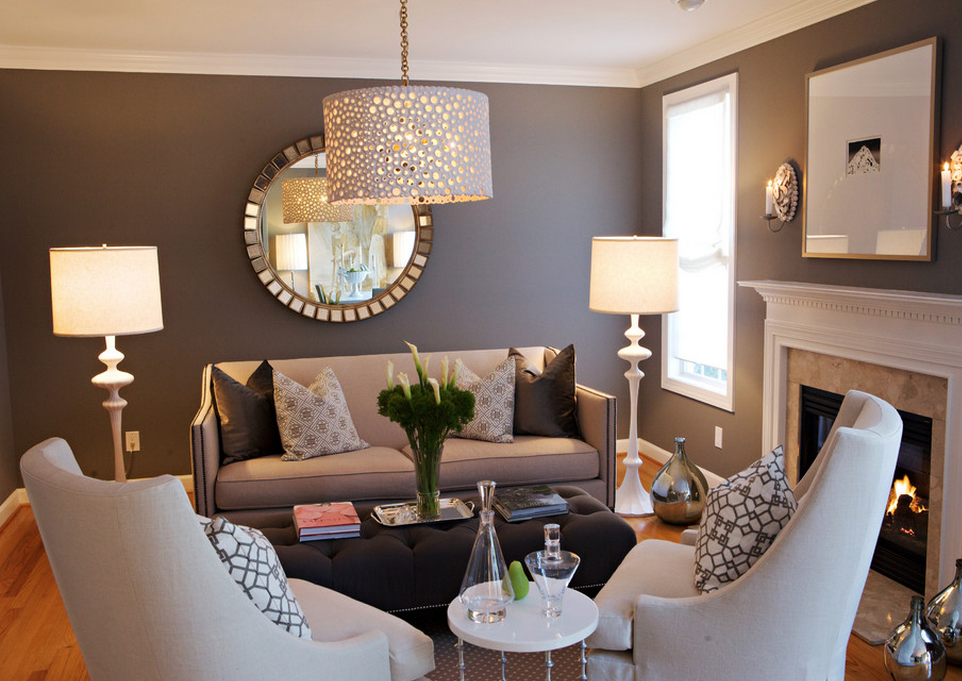
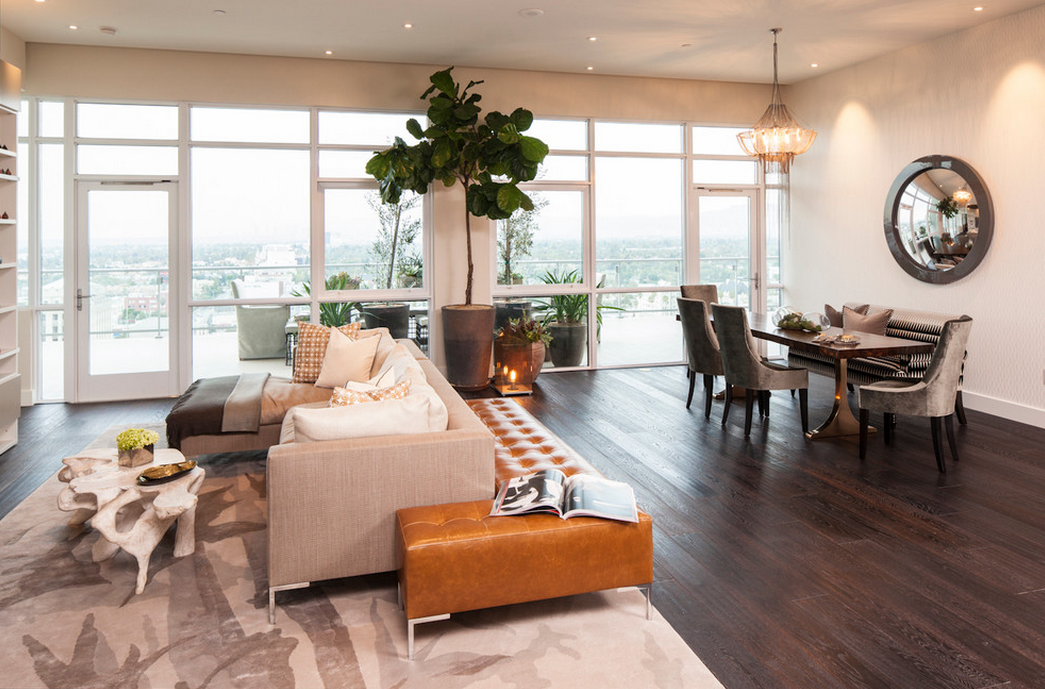
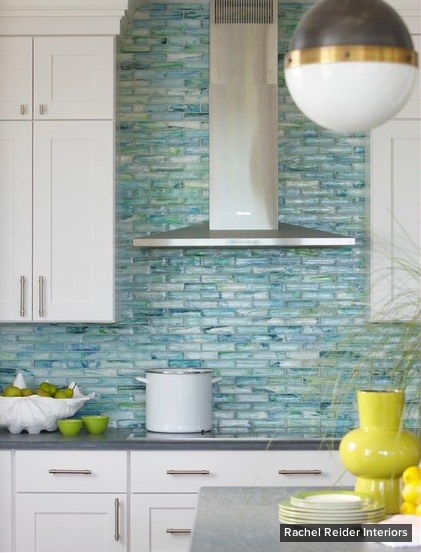
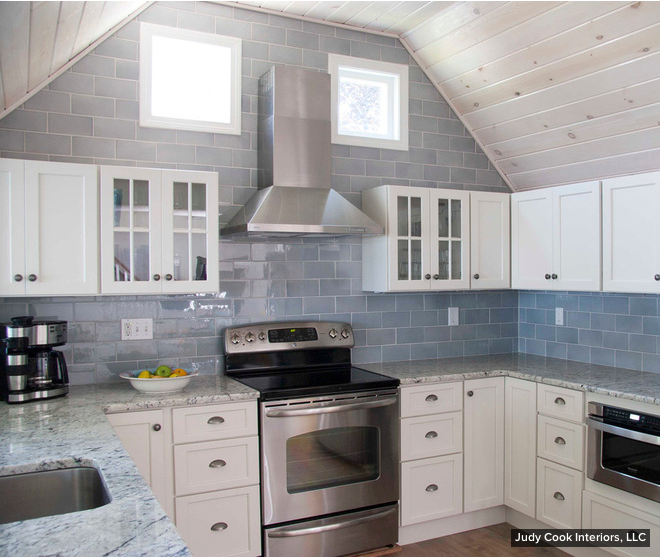
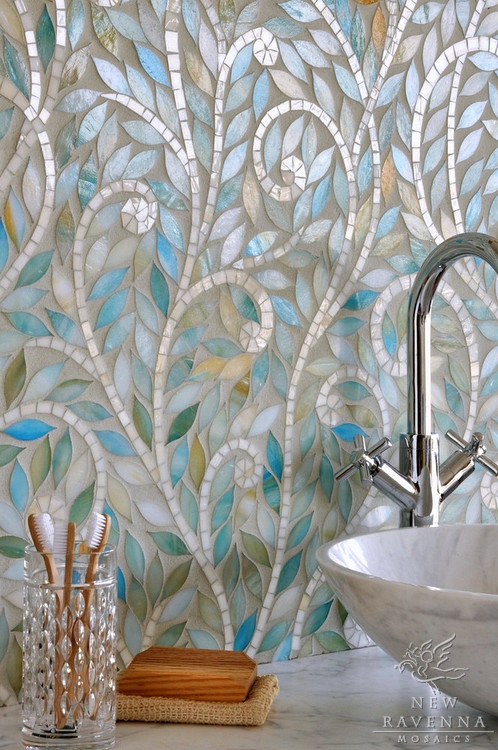
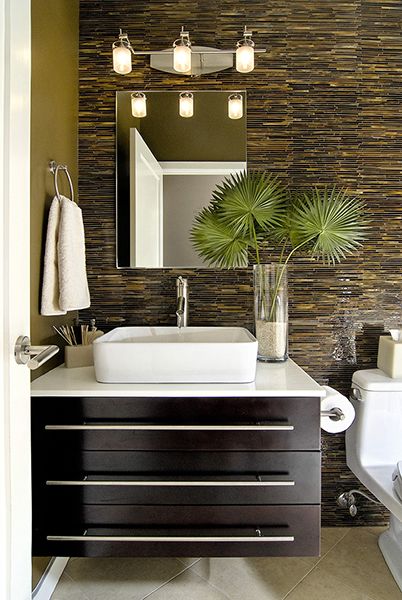
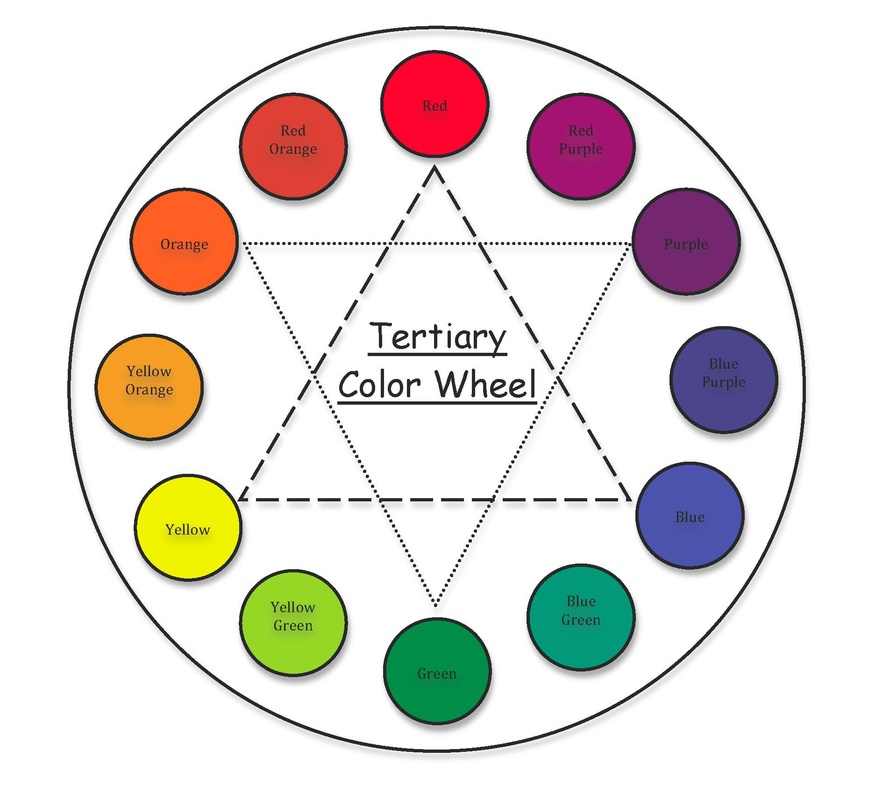
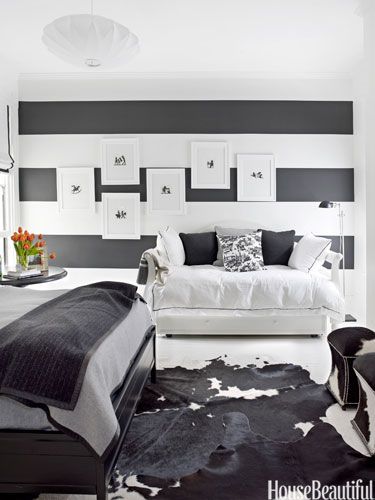
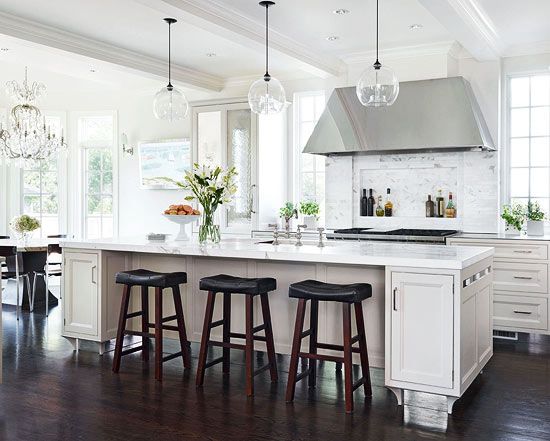
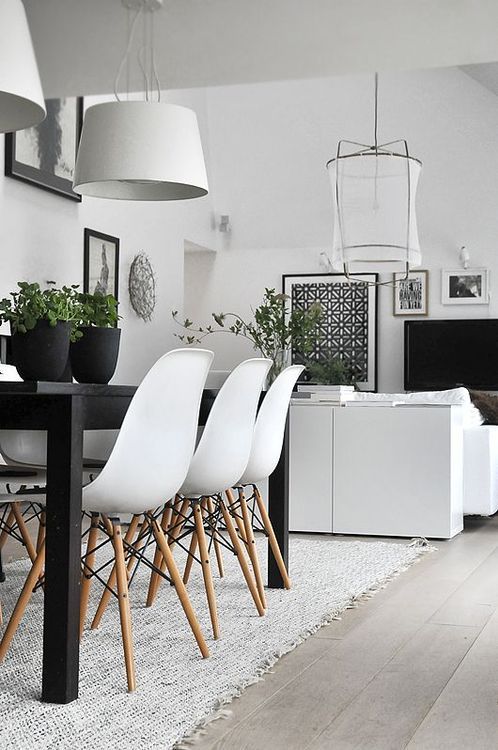
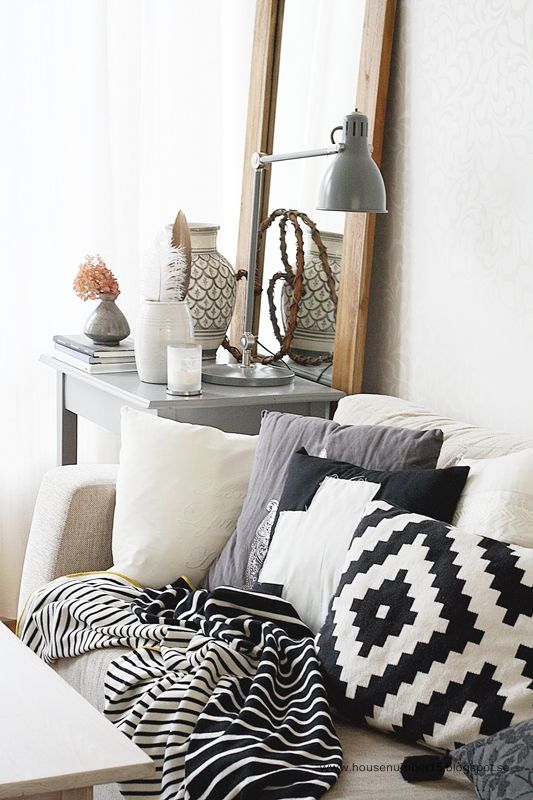
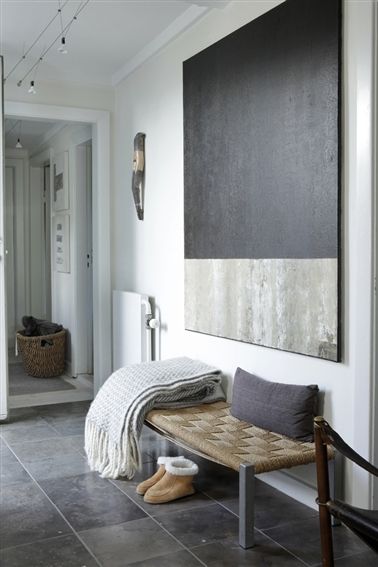
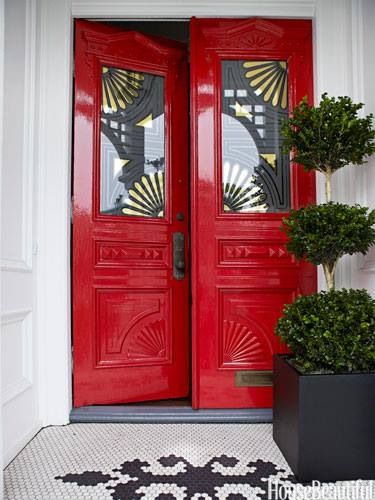
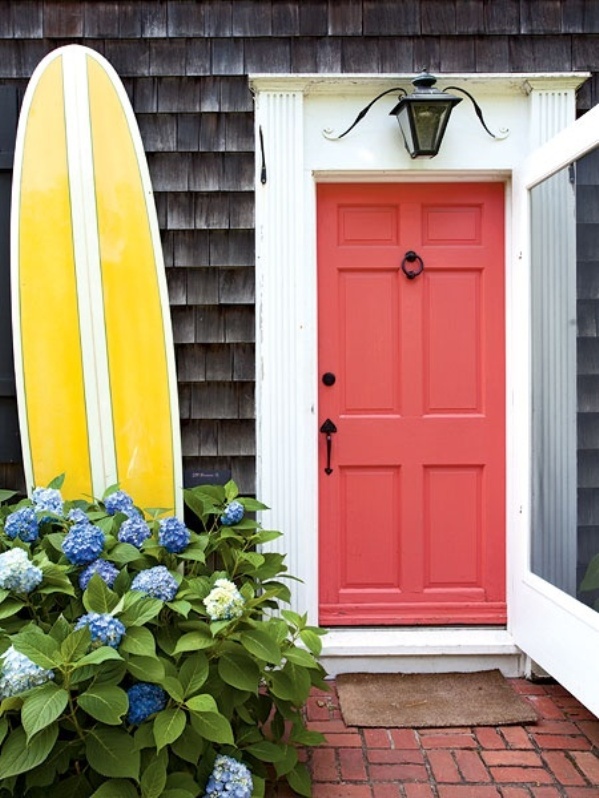
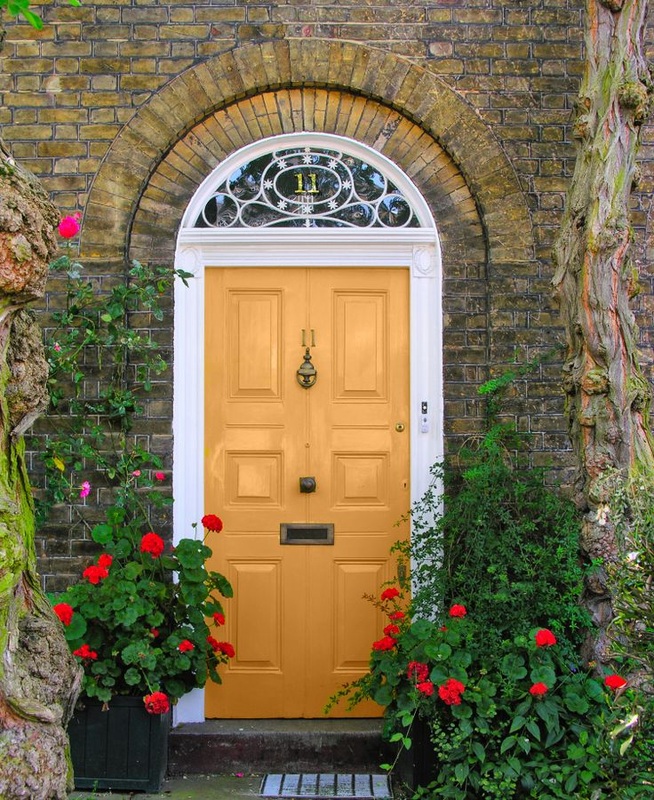
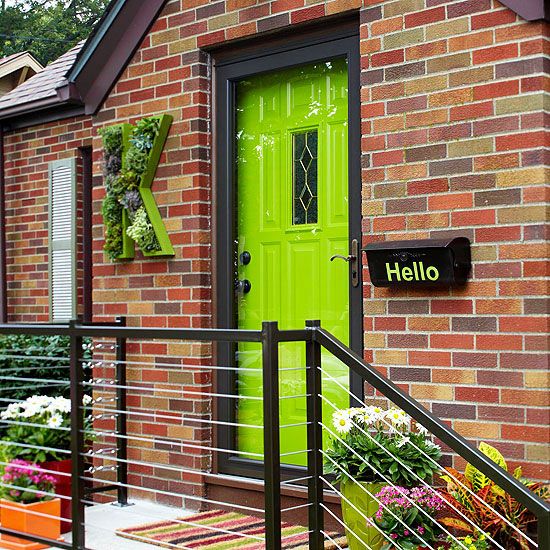
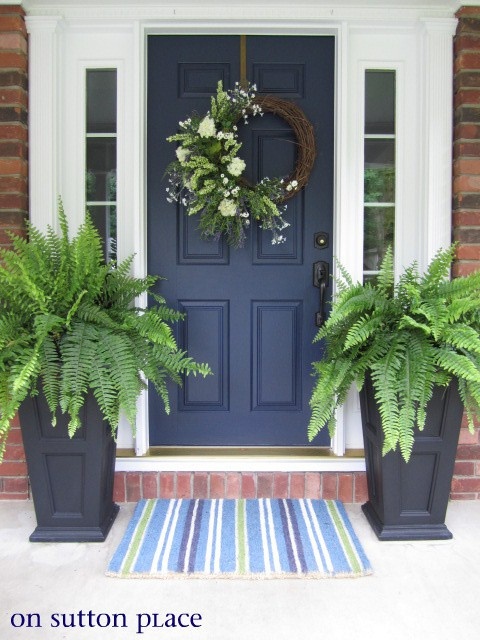
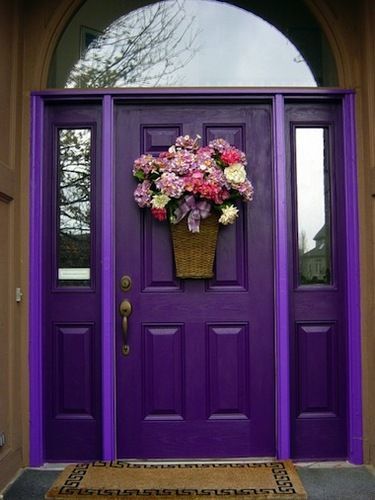
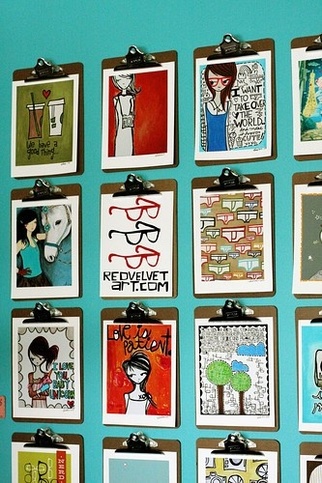
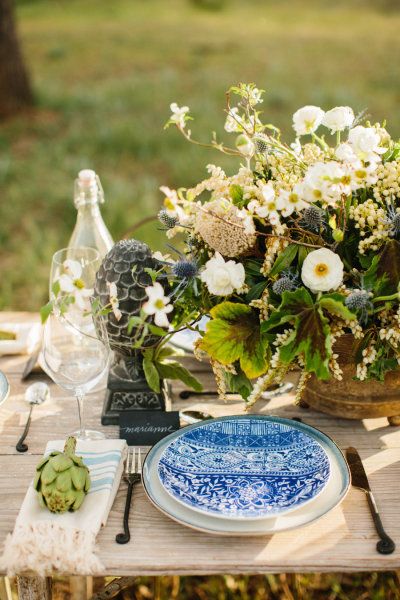 Photography: Marianne Wilson Photography; Floral Design & Styling: Knot Just Flowers Photography: Marianne Wilson Photography; Floral Design & Styling: Knot Just Flowers A stylish or cute centerpiece is not just used for weddings. It can be used for even the simplest of occasions. Having a family friend come over? Welcome them with your new dish set and flowers from the garden. Your spouse is coming home early? Whip up some table art by using your finest linens and china, light those candles and express your appreciation for your better half! There is no need to hide away your grandmother's linens or your newest purchase at a design fair, just like a kitchen being known for the center of a home, a nicely set table warms the heart of any space! Listed below are a few photos and tips on creating a stunning atmosphere at your table. Theme: What is the occasion? Is it a family dinner, a holiday, or lunch with friends? Select a theme that its the occasion. Possibilities include using the months freshest flowers or arranging the table in a way that flatters your guests. Is their favorite color purple? Serve grape juice and bring out the closest linen color you have. As a general rule of thumb, as a family you should own one tablecloth or napkin set in every color of the rainbow. Now, don't fret if you only own white linens. A white tablecloth, will forever remain the classic table setting. A great way to dress up that classic look is with colored dishes, glassware, silverware, or floral arrangements. Table Coverage: Your table cover is the background for the food and table appointments (dish ware) you place onto it. It protects the table and makes for less noise. Placemats and/or tablecloths may also be used. Sometimes a table is left bare, but whatever your occasion choose a cover that is appropriate for that time. Matching and blending colors is a great way to spruce up your meal, also don't be afraid to mess with textures in the dishes, centerpiece and more. Finally, don't forget to use something quite different for contrast. Place Setting: You will need at least 20 inches for each person's dishes. Place the plate or china in the center, about an inch from the edge of the table. Place the knives and spoons on the right, and forks on the left. Turn the edge of the knife towards the plate. Napkins folded into oblongs are placed next to forks, but placement of a napkin will always vary. The first beverage glass is placed about an inch from the knife, additional glasses to the right of the first glass. If coffee is served, the cup is placed on the saucer and set to the right of the spoon. Fresh: Inspired by the colors and aromas of nature, cut fruit makes a very appealing centerpiece when it's done right. Make sure to use a variety of fruits that will stay firm for the duration - melon, pineapple, apricots, grapes and lemons would all be good choices. You'll also need wood skewers of varying lengths and a stable base. Cut fruits are a natural for a summer celebration. They smell wonderful, look great, and you can eat them if things are running late in the kitchen. Let It Resemble You: Your home should be a reflection of yourself, your hobbies, family, loves, style and personality. When you prepare dinner it's a reflection of your heritage, your appreciation for food and your patience in learning the right ingredients. Your table setting should flatter not only your meal but who you are, what you like and accent your homes atmosphere! 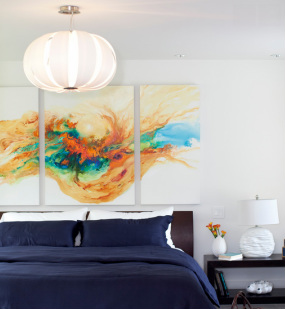 Upon growing up my mother took me and my siblings to church every Sunday, alone. Growing up without my father attending church was confusing to me. "Why would someone not want to worship God on a day of rest?" I often pondered. It wasn't until later that I learned that my father had no religion, even though he believed in God and supported our beliefs, and because of this, put a slow and steady strain on my mothers eagerness to attend church. By the time I was in my teens I had monthly church magazines arriving, from my mothers parents, for me. They were to help me build my personal testimony, and in hopes I would never feel alone attending church. Which they did quite well. I read an article one summer day with a question that still sticks with me, it went along the lines of, "If a non-member was to walk into your home or bedroom, would they know your beliefs?" Essentially the question posed, did I represent my faith in my room, either through: art, books, posters, and/or simply my actions? I decided to make the change. As a member of a Christian faith, specifically The Church of Jesus Christ of Latter Day Saints, we are known for overloading our homes with posters, memorization charts for youth, statues and plenty of temple and church-like photos. It's great feeling, even if you have no religion, to walk into an environment and feel welcome. Art and warm smiles always accomplish this feeling for me and my family. Listed below are tips and tricks on showing off your faith, in style, and in hopes that those that you welcome into your home, will feel at home. Less Can Be More. Like previously stated having multiple photos in the same area, can be overwhelming. A great way to show off your religion, in a room, is through small art. The example listed below shows a framed quote from the Bible. Another way to make a settle statement, is hanging up art that speaks to you. Being LDS, we believe that God the Father and Jesus Christ created all things and in that: talents. Art is a talent, if something speaks to you or your family member and it looks great, find a way to incorporate it into your space! Statues: Many faiths have statues, and of those that they idolize and/or worship. The example below is of the Christus, which is displayed in the Salt Lake City visiting center, only the actual statue is 10.5' and the replicas you can purchase only run about 15" tall. Nevertheless, display whatever statue that represents your faith in a safe spot. Somewhere your guests can admire the craftsmanship that took place and possibly ask you what your statue represents. Reuse. You have probably seen this before, but lets take reusing church art and stained glass to a new level. Take out your standard window and have this old, beautiful art piece put in! If that's outside your budget, consider this: weld two strong and narrow chains to your glass and hang it in your home. Not only are you giving this piece another life, but it will be a conversation starter and a great way to add antiques to your home. Displaying Family Photos: A classic way of showing off your religion, through a very discreet way is hanging up or displaying family photos. To become like a pro, spray paint or purchase frames of the same color or hue. If you want to go one step further, turning your photos into black and whites adds a timeless touch to any photograph and is sure to be adored for ages. Appreciate the Outdoors. If you're building a new home or remodeling try adding large windows into your space. Because, if God created us, he created the world we live in. Everything is his, so take time to appreciate it. Simply put, wherever you live, find the time to enjoy the outdoors. When you're finished with redecorating your space, take a step back. Does it represent you? Does it resemble what you believe in, and who you believe in? Does it make you smile, or possibly tear up? Can you feel the joy and peace that it brings to your home? If so, bravo. Your home shows off your religion, and in doing so it shows off a part of who you are. 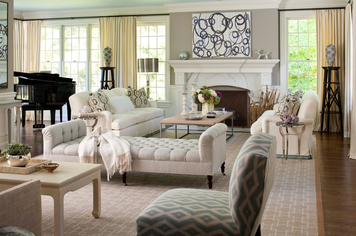 Designer: MuseInteriors; Photographer: John Bessler Designer: MuseInteriors; Photographer: John Bessler Space Planning sounds rather simple at first, throw a sofa there, put the chairs on the side, and coffee table in the middle, right? Of course that's not always quite how it works. Successful planning requires considering a variety of tangibles: physical limitations, size,furniture, flow, and more. Before you start remodel or redesign your space consider the following. 1. Graph it. A great way to carefully plan out your space is measuring your space and using each graph paper square as a foot. Cut out your furniture using the same tools. and place them in your floor plan. Consider the following questions. Can you walk through the space? Can your guests have a conversation without cranking their necks? Is it a comfortable layout? Can multiple people pass through the space at a time? Can you reach the tables from sitting down? And more. When you are done creating your optimal space: make the move, take a seat, and have your family sit down, then ask yourself, "Does this work?" 2. Determining Function. Think carefully about what you want your new room to do and who will be using it. What will be required of this space. Will you be having family movie nights? Hosting parties? Also, consider the ages of those in your household, and if they need space for disabilities. How durable and accessible does everything need to be? Be flexible if you need to, so that your room can grow with your family. 3. Make Your Home Flow. Your new room needs a space that not only flows within itself, but flows with the other rooms in your house. A great way to accomplish this is by using materials and colors similar from room to room. Consider the furniture, millwork, baseboards and interior doors this will allow your home to visually flow. You can accomplish even the biggest room successfully by combining colors, graphing the plan and then laying it out, finally ensuring that the rooms' design is functional. Take a look below at plans and examples on how to design your space. 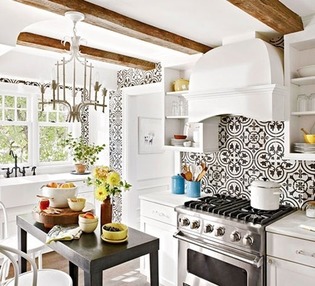 Today on this Interior Design blog, we are going to discuss picking out a backsplash for your most used rooms: the Kitchen and Bathroom. If you feel overwhelmed, you're not alone. Listed below are five tips on how to create a stellar room through your backsplash. First: Create a Budget and Stick to It. One of the most important aspects of remodeling or renovating your room is the cost! Take time to determine how much you can reasonably spend on this room, and stick to that budget. You'll be grateful later. It can be really easy to fall in love with a certain type of design and justify spending more than you can comfortably afford. Shop around, compare prices and use sample pieces to determine what helps that room look stellar. Second: Take a Look at the Scale. How big is your space? If you choose a tiny tile for a large room, chances are it might look too delicate or simply out of place. If you don't know how to compare your space, take a look online or my examples below. Big and open floor planned rooms have larger tiles, and typically (because bathrooms tend to be on the smaller side) the restroom in your home will have a more simplistic and smaller scaled tiled. Still lost? Select your Countertop First. If you still feel daunted by all the options, try focusing on the countertop selection first. This is your workhorse in the kitchen and can constitute a good chunk of your budget. Generally, there are fewer color and pattern option for countertop materials, whereas backsplashes are practically unlimited. Also, keep in mind that your countertop will be paired with your backsplash. Save a sample of your countertop and take it with you shopping. Or if you already have a countertop in place, and no sample, take a well-light picture with your phone and compare as you go! Next: Stay in the Same Color Tones. A great way to make sure your kitchen or bathroom looks cohesive, is choosing stones and splashes that are in the same color pallet. Whites with neutrals, browns with beiges, blues with lighter greens and so on. If your lost on color, simply take a color wheel in with you and choose a backsplash that is color partners with your countertop material. See example below. Finally: Hire an Expert. Some homeowners just have plain difficulty with DIY projects. All too often you are asked to make too many decisions in a short period of time. Do yourself a favor, if you are prone to giving yourself a panic attack on projects like these, and hire someone you trust to engage in your home renovation. It will take time, but loving the space you live in is worth it. 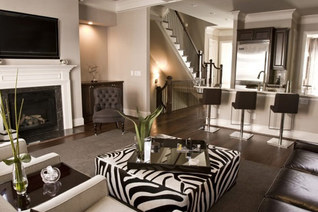 A friend once told me to never wear black with brown. Still to this day I find this perfectly acceptable. Depending on shades, black and brown can look extremely classy together. However, what will forever remain a classic look in the world’s eyes is black and white paired together. We can trace the trend back to the early Egyptians, then a reappearance in the Art Deco period, and now in the 21st century we are finding ourselves gravitating towards clean lines, bold design and drastic color. Listed below are a few simple ideas on how to incorporate this trend into your home. Bold Stripes. By adding thick stripes into your home you create the illusion of a wider space. In addition the black and white combination is both playful and modern. A great way to accessorize your new walls is with a black or white frame and large white matte board surrounding your favorite photo or art piece. Eating Habits. Create the appearance of a clean dinning room or kitchen with a white surface and black chairs. Before purchasing new counters, test them with mustard and wine to ensure that once you wipe it off the counter a stain isn’t left behind. When you discover this wonderful countertop, or table, you will discover that fewer messes are left behind. With your white surfaces, black chairs deliver a great pop of contrast. If you are afraid of messy children ruining your nice countertop, or table: the opposite can be accomplished as well with a dark or black wood table or stone countertop with white chairs. This time ensure your chairs are easy to wipe off or throw in the laundry! Pillows. Any design trend nowadays can be done on a budget through the smart use of pillows. One of the things you need to consider about pillows is the interior filling. When purchasing pillows you are paying for: fabric, stitching and the interior filling. Many of us like down inserts; however, at my household we have nothing with down feathers, due to my husband’s allergies. Remember through any designing you do throughout your home, guests will eventually enter, be guest conscious. Think of allergies, of the elderly and of children. The next step is picking the fabric. Make sure – if you already have the walls painted black or white- that the pillow fabric you choose is the same shade. Take a sample of the fabric home to compare for the best results. Art. This is easy. Find art, any style, with any additional colors, and just make sure the main colors in the art are black and/or white. Hang it up where your guest can admire it and you are already a trendsetter. 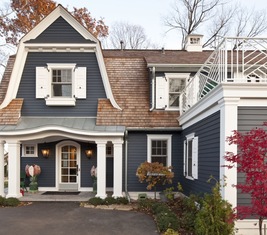 As an Interior Designer you are asked quite frequently about your professional opinion on the aesthetics. “How do you think it will look?” If you’re choosing a new roof for your new or existing home, aesthetics are important, but so too are the material’s cost, weight, how it will wear, and installation requirements. Having personally installed a roof I did a bit more research to make sure that everything was taken into consideration. The opportunity we had with this new home was to acquire a new roof. The options were not endless, however. We had approximately twenty choices, of the same material in the same monochromatic color schemes for every shade available. If this is the case with you and your homebuilder see it as a challenge to paint a prettier picture. Pick a neutral roof; this will give you the most options. Then decide what you and your family’s personality reflects. Listed below are a few examples, and pictures of the options I gave my client for their selection. Classy: White and pastels or black. If you are a classic, you probably tend to invite your friends and family over quite frequently. Your dinners are also probably not your casual outdoors barbeque. So, accent your home with your elegant style with a bright off white and settle colors. Black will make your home pop, in the best way possible. Similar to how candles lit on a table. Pastels will give your home a softer feel, more delicate; like a fancy Easter Dinner. Spontaneous & Fun: Colors with a neutral roof! You are crazy, and your family and friends for the most part love that about you. So show off your spunky personality with your homes exterior. In the option listed below a fun combination of reds and oranges are chosen. If you decide to paint your home, try to base the color pallet off of something you would see in nature. An example being, a colorful picture of the ocean has many blues, greens and light beiges. World Traveler & Traveler at Heart: If you earn to see the world, a classic and settle home exterior is for you! The beauty about homes, is that they are different everywhere you turn. But no matter where you go nature is sure to be found. In option three below a beautiful home looks like it could be located in a variety of destinations. The key, all the lush greenery! Plant multiple topiaries and keep up on their shape for your home to come together magnificently. Foodies Unite: If you are like my family, good food is extremely important; and who knows good food better than the Italians and Spanish! The key to putting together this home is to create a warm feel. You will need pastel accents, rich colored trim, and outdoor lighting. In the option four listed below, you will see a rich gold/mustard color is used on the home in order to accomplish a true homey feel. Beach Lovers: You know where your heart is at, and it’s located within a few feet of the ocean! A coastal home is simple you’re in luck! In order to accomplish this home you need accents of blues and whites. That’s it. Choose where you would love to put them, you can’t really go wrong!  Nothing welcomes your guests to your home better than a bold, beautiful color on the front door. Many people have no trouble picking out a fun color to paint the door, but you don’t know what to do with the rest of the exterior look! What about the trim? The key to working with bold colors is to limit them to elements you really want to stand out. Which makes the front door the ideal place to feature a vibrant color! When selecting the supporting hues for trim, vases, and more –don’t try to compete for attention. Check out the photos below and learn what your door color says about you! Red/ Pink: This color tells the world to “Look at me!” You are youthful, bold, and full of excitement. You are not afraid of standing out, or saying what’s on your mind. Any plant by this door is bound to make a stellar impact. Orange: You are friendly, cheerful and confident. This color is great to accent with dark blue vases or home address numbers. Yellow: You are optimistic, and your guests will find a sense of warmth before even entering into your home. Try planting deep purple flowers in front of your home for an even greater impact for your guests. Green: This color represents peace, growth and health. Whether or not this is true within you home, your front door will reflect the nature in your neighborhood. Blue: This color represents trust, dependability, and strength. White or light/warm grey trim works best with this door. Try adding dandelions or using a yellow or orange knocker on your front door for a nice settle touch. Purple: You are creative, wise and imaginative. This color reveals a “free spirited” person who is comfortable taking risks and thinking differently and dreaming big. Remember, the terrific thing about having a paintable front door is the ability to change your doors color over time! Having the ability to paint your front door allows you to update your homes exterior while sharing your evolving personality with the neighborhood. 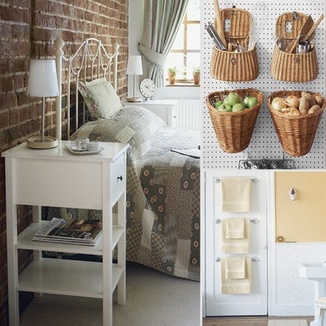 A few days ago I found myself thinking, “Placement is everything!” Why? As a temporary Barista, I had accidentally burnt my hand with 250-degree water. I will admit that I am a clumsy individual, but never have I caused a serious injury to myself. I had traded shifts with another employee who decided to move the banana basket under the water, and there appeared to be enough room for my cup. However, upon taking my full cup of water out for my customer the banana stem had caught the bottom of the cup, causing the hot water to spill over a good chunk of my hand.
Now I don’t blame my co-worker. In fact, I blame the previous Architect or Interior Designer, who had built that “Coffee Shop” as a gift shop, and that’s it. The space was not designed to hold multiple machines, water lines and excessive amounts of coffee. If they had previously thought about making the space a coffee shop, then this individual simply had not thought things through. So today, we will talk about the importance of placement, for all objects. Everything in your home should have a designated place. Your “junk drawer” that we all have lingering near our office or kitchen; should only be ONE drawer. Even then, you should have a pretty confident idea on what lives in that disorganized drawer. Need help understanding how things work in your home? Take one day, just one to carry with you a small note pad. Every time you leave one room- write down what you used. In a separate column make notes on how easy it was to access. By doing this, you will not only recognize all of the unnecessary “needs” you have lingering in your cupboards, but you will find a better way to organize your rooms. Here are a few examples: KIDS. If you have children, you might be on the verge of finding it to be impossible on getting them to clean up. Now in order to get them to clean up, you too must show them that cleaning can be easy…because it can! Use colorful baskets for toys, clothes, shoes, and more. If they are old enough, take them shopping with you. A child will always respect an object more if they felt like they purchased it. Finally, when you have set aside areas for these lovely bins or baskets, create times of the day to clean their spaces. Whether you teach them that after each time they go play in a room, or after every meal. Make a game out of cleaning it up (maybe the ground is lava, and you don’t want the toys to melt!). Finally, Understand that your kids listen and watch you, all the time. If they hear you complaining about cleaning, they will complain; likewise, if they see that you leave rooms messy, so will they. FOOD. The refrigerator can be your friend and your worst enemy. However, a way to minimize looking into a fridge for more substance is to clean your shelves, use Ziploc baggies with labels, and designate spaces for: Dairy, Veggies, Fruits, Snacks, Sauces, and Meats/ Cheeses. Find a day once a month to clean your shelves. By cleaning simply and yet everyday objects you will find your mind becoming uncluttered itself. BOWLS & TRAYS. Make sure they can stand on uneven surfaces, and make sure they can hold with added weight. A simple way to make sure you don’t purchase an unstable object is by placing the bowl or tray on the store floor and then making sure it can hold the weight of your purse or wallet, without rocking or falling over. After you purchase your beautiful organization helper, place it in a spot where it is either so obvious or so hidden that no one can hit it on accident. SHOES. If you are like my husband, you have an extreme tendency to take off your shoes as you close the front door, and if you’re like me you get a little ticked that seven pairs of shoes are piled up next to the first place every stranger and friend walks in. You want to make a good impression, but you also want those shoes hidden! To solve this simple dilemma acquire a bench or tiered rack, place large baskets, tubs, or matts in the necessary slots where shoes can remain hidden and yet ready to access as you prepare your daily adventure. MAKEUP. I personally don’t like to publically display how vain I can be, so my makeup is in a drawer. If yours is too, and you have trouble separating your hair from your foundation listen up! Next time you order something online-keep that cardboard box! Or parts of it. Use the flaps to cut out dividers for the necessary sections of makeup world: your go-to brush in the bottom, foundation and powder in the top left…etc. etc. OFFICE SPACE. At work or at home, you can be certain that one day the papers will suddenly form their own skyscraper. A great way to minimize this is with simple Walmart filing bins or any wire paper tray. They don’t have to be by category or even make sense, but the simple fact that you have something in a compact and organized-like stack will make you look like a pro. Now that you have a few tips, go out and explore your home. What do you truly need? What could someone else use more than you do? How do you operate on good days and on terrible days? How do we make your life simpler? You have all these keys, all you need to do is a little soul searching. 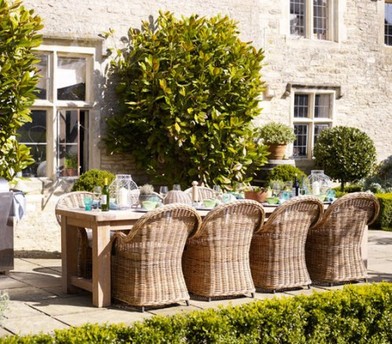 Who here wants a beautiful outdoor living space? I know I do! With warmer temperatures, bright blue skies, and sunny days what’s not to lure you outside? If you’re planning on doing any of your eating or lounging out there, then it’s time to rethink how that area looks and feels. Short on space? A few square inches can go a long way. Tight budget? Work with what you already own. No garden or greenery? No big deal. From yards and terraces to patios and porches, these easy decorating ideas can work for any spot you have big plans for beautifying.
Patio Primer. Give your outdoor space a fresh look by sticking to a monochromatic palette. You can pull off a polished look without overdoing it. Tropical Punch. Want to add a touch of fun to your outdoor space? Cue the colorful accents! A terrace can get a bold puck-me-up from cushions in vibrant colors and modern prints like ikat, stripes, and eye-popping florals. Garden Party. Dining alfresco is about gathering family, entertaining friends, and escaping your typical daily routine. Any rules to follow? Be smart about your outdoor style and choose weather-resistant furniture, coverage from the sun, and a solid base for setting up your table. Seeing Red. Want a modern and budget-friend trick that won’t involve an entire patio makeover? Focus on a few decorative elements that strategically weave a splash of red throughout the dinning space. Rainbow Bright. Minimalists, you’re in luck! An outdoor space can become whatever you make of it. Carve out a casual reading or conversational area with a few smart seating options. Before you view this idea as boring, consider how a trio of punchy colored chairs instantly brightens up a stone yard. Patio Dining. Formal without all the fuss. Surround a reclaimed teak table with wicker chairs to keep the mood light and relaxing. Choose white chicken wire lanterns for an unexpected and yet oh-so-easy tabletop décor. Swinging Pretty. You could have all the space in the world; yet still head to the same seat every time you step outside. Longing for your own special escape? Suspend a swinging seat bench in the corner of a deck to help you breeze through those lazy days of summer. Cover Up. If your outdoor space doesn’t have an awning, create your own with a white fabric canopy. Have plenty of seating options (stackable stools, cushioned benches) so guests feel welcome. Swinging In The Shade. Create an intimate nook for lounging, reading, or just zoning out. Find a spot in the trees to suspend a garden hammock and jazz it up with a few hanging lanterns. Scatter Lights Everywhere. Yes everywhere, everywhere reasonable that is. Along the pathway, on the patio umbrella, hanging down to accent your conversational area, in the trees and in the bushes, and possible Chinese lanterns along the way. This not only looks like you know what your doing in the daytime, but sets the perfect mood at night. |