Found On: Homedit.com 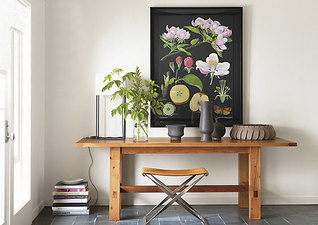 Found On: MakingItLovely.com Found On: MakingItLovely.com Whether or not guests see your home on a regular basis, the idea of having a home that looks and feels great is a desirable one. Adding value to a property shouldn't just be for those that are planning to sell in the near future, for many small additions can add life to your home. So whether you're selling or staying put, consider these small improvements that can be for less than $100.
1. Accent Lighting A few cleverly positioned floor and table lamps or even twinkly outdoor lights can make a difference to the atmosphere of a room. These items are relatively cheap, and you can find them almost anywhere so it's definitely worth shopping around. If you want to be specific about the type of mood- the warmer the bulb the more romantic and softer on skin is reflected, the whiter the bulb tends to bring a clean or natural feel to a room. 2. Mount/Prop a Mirror The human brain can easily be tricked, and mirrors are great at creating the illusion of space and bouncing light around a room. For a chic look try looking for mirrors with dark wood or metal crossing frames, and for a more contemporary/modern look try finding geometric shapes or placing an oversized mirror on the floor and propping it up against your wall. 3. Paint It! Everyone wants a new kitchen or bathroom, but there is no way to complete a remodel of such spaces under $100. However, you can freshen up those spaces with light pastels, or whites on the bathroom walls, cabinets or even your vanity. In these spaces having light is important for prep work (either on your face, or for your food). Because of this, you want to make sure to work with the light (hopefully natural) that you are given. Light bounces off lighter walls better and creates a clean effect in those spaces. For a pallet of pastels and whites to choose from click here. 4. Planting Indoors and Out Whenever passing down a street full of "cute" homes you'll be sure to find that the outdoor landscaping is typically superb. What is great, is that you don't need to have a green thumb, or even know how to keep up with plants to boost your outdoor curb appeal. Trees, shrubs and ferns tend to need water about once to twice a week, and some even less. If this seems too difficult finding a colored mulch and placing solar lighting up your walkway is a sure way to add a more dramatic effect coming up to your front door. If you want to take planting a step farther, any room can be improved with a fresh piece of greenery. Remember to keep it in proportion (or just think smaller is better), and plotted plants as opposed to cut flowers are generally preferable, as they are less likely to wilt. 5. Freshen Up Your Front Door Painting your front door may seem terrifying at first, but don't let it be listed are four simple steps to become a door-painting-pro. 1. Remove the Door and Clean: Use a slot screwdriver to remove the hinge pins and then remove the other half of the hinge from the door. The door will be heavy, so get help to lift it onto some sawhorses. Remove all the hardware off the door, including the door knocker, peephole and doorknob. Wash and allow the door to dry before painting. 2. Prep the Door: Patch cracks in the door with a quick-drying wood filler. When it is dry sand the filler smooth so that it becomes flush with the door. 3. Apply Primer: If the existing paint is in good condition, no primer is necessary. However, if you are using a dark color like red, it's advisable to use a primer first. Prime all six sides of the door, including the inside, the outside, the left and right edges and the top and bottom. Any surfaces not primed will absorb moisture. Let dry completely. If the door's surface still has cracks, fill them with caulk . Let the caulk dry and re-prime the spot. Use a fine-grit sandpaper, such as 180 grit, to smooth the surface and remove any paint drips particularly in the crevices of the panels. Use an old paintbrush or a tack rag to brush off the dust from sanding. 4. Paint the Door: Start painting with an angled sash brush, painting the corners of the panels first (raised or recessed). Work from the top panels down to the lowest. Don't use too much paint or let the paint puddle. Use a roller to apply the paint to the raised panels, rolling with the grain of the wood. Then paint the muntins (top and then bottom), transoms (top, middle, bottom) and finish with the stiles. Paint the door with several coats, continuing to use the angle brush first and then the roller. The darker the color, the more coats that will be needed. 6. Pick a Scent This is a sensitive subject at my house, due to my husband being allergic to floral scents. So if you want a fail-proof way to get your house smelling great, but not over-powering try Doterra essential oils with an aromatic diffuser (essential oils that are 100% naturally derived from leaves, roots, and petals), or you could simply put lemon slices into your garbage disposal, or try slicing them into a beautiful bath of steaming water (if you do this, be sure that it is out of reach from children). 7. Organize Your Guest-Used Rooms There may not be anything more agitating than being a guest who has to sleep in a messy room. Even if they would normally have a messy bedroom for themselves, having a room where you know where everything is placed or everything has a place gives them a peace of mind. Try using cake plates, low trays, racking systems, benches, hooks or even clear Tupperware to store and place the objects your guest is welcome to use. 8. Reboot The Coffee Table Much of the art of creating a stylish home is stopping to consider how you have things displayed for guests, and ease of access. A pile of arty hardcover books piled on the coffee table may sound cliche, but it can be a rather effective way to add personality to your home and keep guests temporarily entertained with your reading selections. If you rather do something more decorative, try an oversized low bowl to store fruit, remotes, wooden toys, or art projects. 9. Add a System for Organized Hello's & Good Bye's Clean your hallway. Is your entryway hall a place for shoes to pile up, coats to be tossed, mud to be tacked in, and keys to be left in pockets. Hallways get more of a bettering than nearly any other place in the house. Especially if you have bikes, strollers or children, and especially if you live near or on a ranch. However, a few minutes with some all-purpose cleaner, a duster and a trip to Target, Wallmart or the Container Store can make all the difference. Try a dresser (to place shoes, books, scarves, sweaters or coats), or a bench simply to unload your daily gear (and store the shoes underneath), a simple key-hook near the entryway can lead to less lost keys can better habits leaving from, and coming into the home.
0 Comments
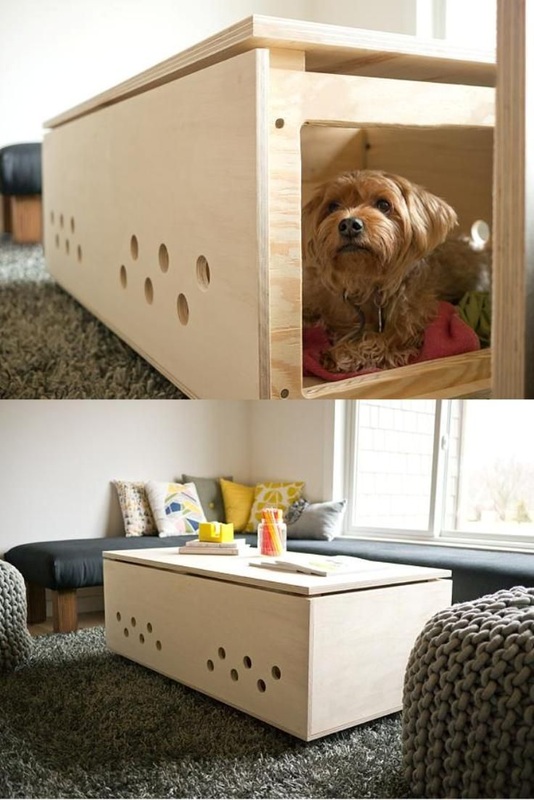
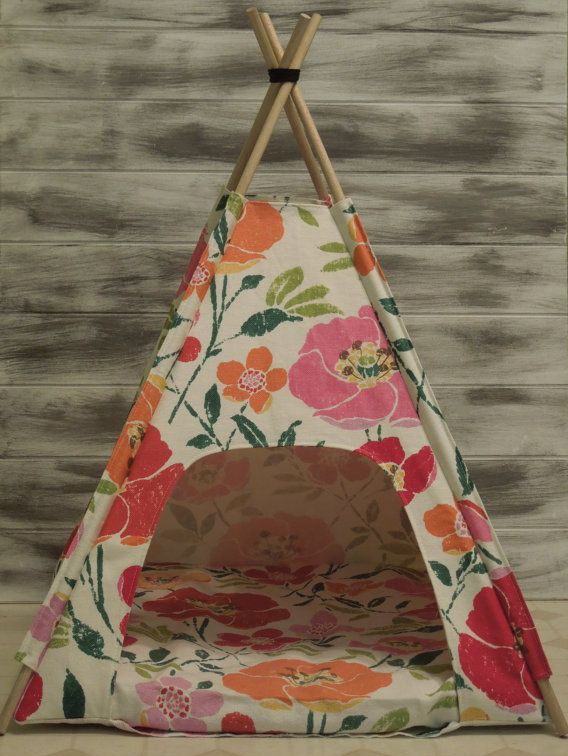
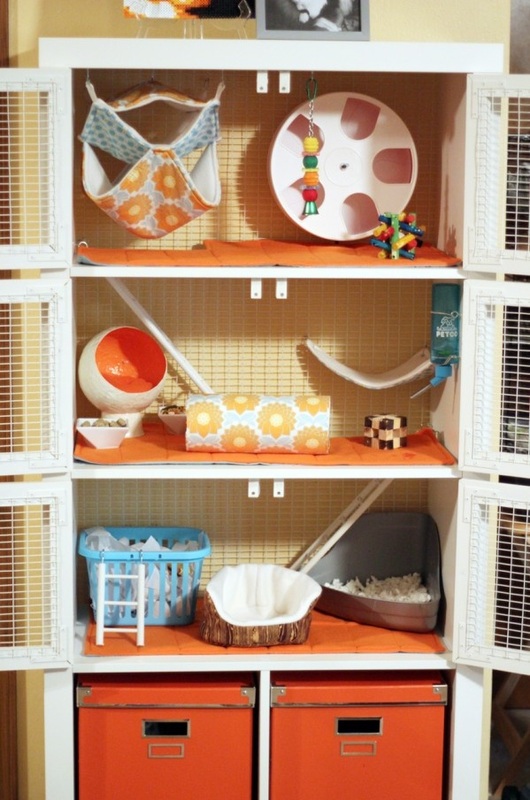
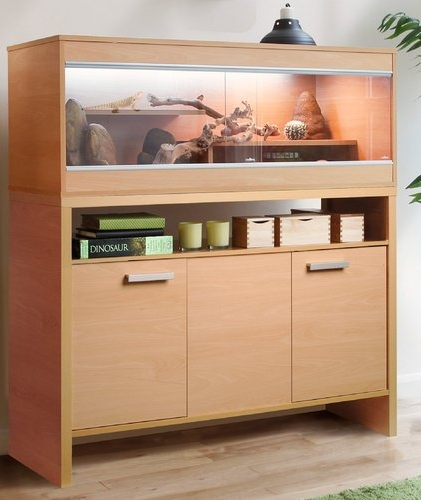
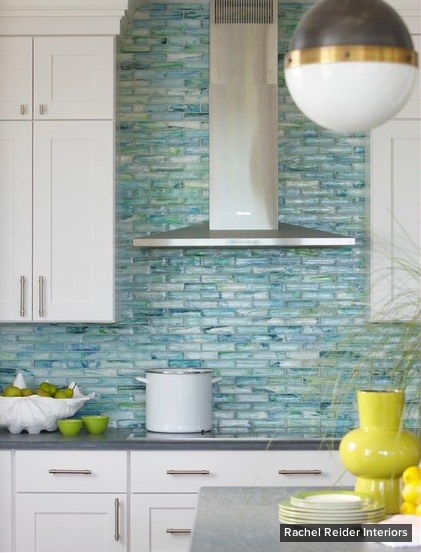
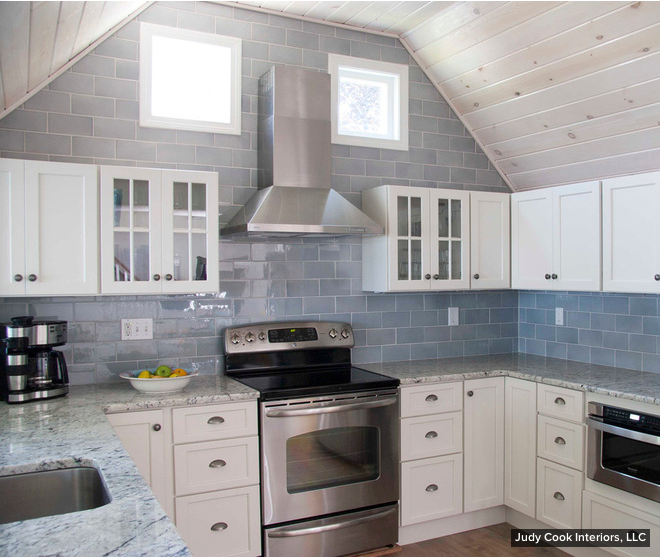
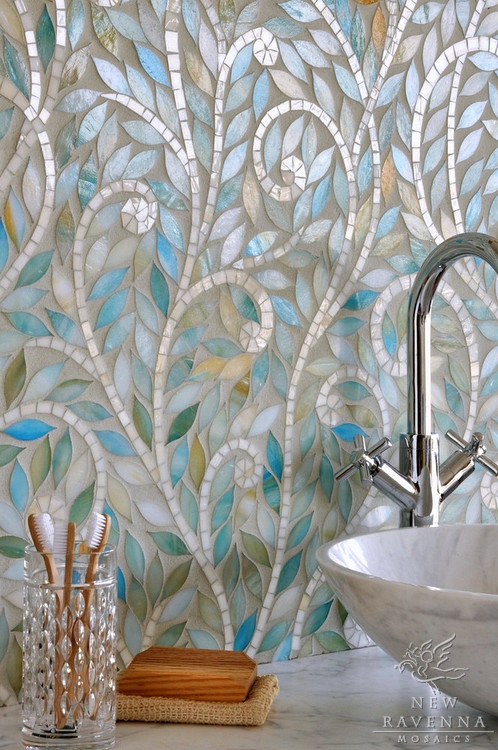
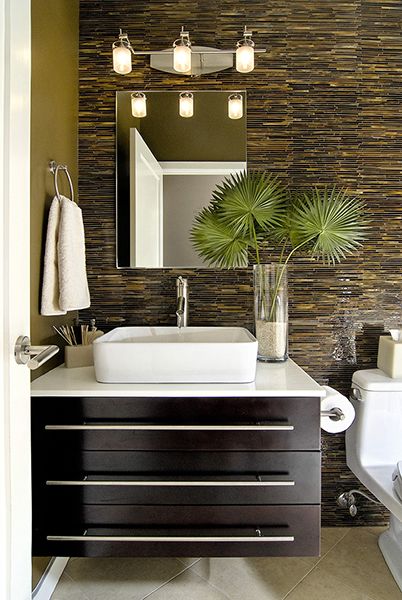
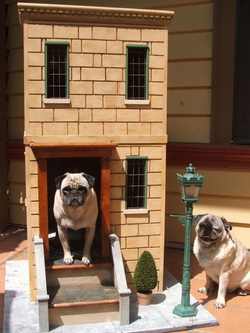 Growing up with dogs, cats, many fish and a lizard I understand the frustration my parents had when it came to where those pets slept and where they ate. The common questions would arise, such as, "How do I hide the cage?" "Will I ever stop sweeping up this hair?" "I wonder if there's a better place for the pet to live?" Now, as an adult who has a husband who frequently travels, my little family is debating on purchasing and caring for a small animal for our small space. As a designer one of the thoughts I had was how to keep my home clean and where to keep the pets' living quarters. If any of you have stumbled across this dilemma, on creating a stylish and sensible place for your pets, below are a few helpful tips and example photos! Reuse. Don't get rid of that old coffee table or nightstand you've had hiding in the basement. With your new or old pet, now is the perfect opportunity to use the spare space underneath the tabletop and store your pets bedding. Want your pet to be even more hidden? Consider boxing in the sides, or creating a simple, yet stylish den for your four-legged friend by scratch. This also works with nightstands (if your pet is extra small), use the bottom half and create a hidden home. DIY. Have you always wanted to give your pet a chic or eclectic styled home? Here is a great opportunity! Whether you have a small dog, cat or rodent this hut (pictured below) is created with four sticks, some string and fabric. All you need is patience and a good eye for what fabric to use! Keep in mind that if your animal is on the wild side a sturdier fabric will be best. Another way to create a stylish home for your pet is using an old armoire, chest, portable linen closet or storage unit for the family pet. In the example below a portable linen closet, once used in the bathroom for spare towels, is used for a small rodent. This creates easy access for the owner and an eclectic addition to any room. Also pictured below is a dollhouse converted into a chinchilla’s home. Add in a sturdier back, a few toys and thick chicken wire and you're all set to play! Purchase and Adapt. There are always going to be modern options for reptiles, fish tanks and birdcages, and a great way to incorporate that into your home is buying a set up that can be used for multiple things. In the picture below you will see a dresser and bookshelf unit that has a cage on the top. When your pet dies, you can either reuse the cage/tank for another animal or take out the wire/glass and use the space for toys, books or spare clothes. Think outside the box. Consider: "Where can I give this animal what it needs and still optimize my home space?" "What are my limitations?" "Is this room too small for them?" "Can I easily feed them near their space?" And so on. Your pet is apart of your family. Treat them with respect and be sure, no matter what stylish home you give them, that they have enough space and everything they need to be a healthy, happy member of your home. 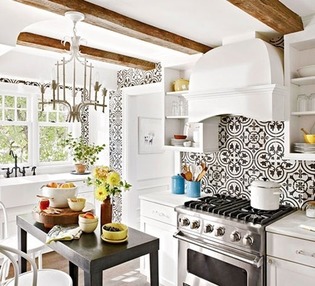 Today on this Interior Design blog, we are going to discuss picking out a backsplash for your most used rooms: the Kitchen and Bathroom. If you feel overwhelmed, you're not alone. Listed below are five tips on how to create a stellar room through your backsplash. First: Create a Budget and Stick to It. One of the most important aspects of remodeling or renovating your room is the cost! Take time to determine how much you can reasonably spend on this room, and stick to that budget. You'll be grateful later. It can be really easy to fall in love with a certain type of design and justify spending more than you can comfortably afford. Shop around, compare prices and use sample pieces to determine what helps that room look stellar. Second: Take a Look at the Scale. How big is your space? If you choose a tiny tile for a large room, chances are it might look too delicate or simply out of place. If you don't know how to compare your space, take a look online or my examples below. Big and open floor planned rooms have larger tiles, and typically (because bathrooms tend to be on the smaller side) the restroom in your home will have a more simplistic and smaller scaled tiled. Still lost? Select your Countertop First. If you still feel daunted by all the options, try focusing on the countertop selection first. This is your workhorse in the kitchen and can constitute a good chunk of your budget. Generally, there are fewer color and pattern option for countertop materials, whereas backsplashes are practically unlimited. Also, keep in mind that your countertop will be paired with your backsplash. Save a sample of your countertop and take it with you shopping. Or if you already have a countertop in place, and no sample, take a well-light picture with your phone and compare as you go! Next: Stay in the Same Color Tones. A great way to make sure your kitchen or bathroom looks cohesive, is choosing stones and splashes that are in the same color pallet. Whites with neutrals, browns with beiges, blues with lighter greens and so on. If your lost on color, simply take a color wheel in with you and choose a backsplash that is color partners with your countertop material. See example below. Finally: Hire an Expert. Some homeowners just have plain difficulty with DIY projects. All too often you are asked to make too many decisions in a short period of time. Do yourself a favor, if you are prone to giving yourself a panic attack on projects like these, and hire someone you trust to engage in your home renovation. It will take time, but loving the space you live in is worth it. |